Bread Maker Banana Loaf is a delicious and easy-to-make treat that you can prepare effortlessly using your bread machine. With the right ingredients and settings, you can achieve a soft, moist, and perfectly baked banana loaf without the hassle of mixing or monitoring the baking process. Whether you’re a beginner or an experienced baker, this guide will help you make the perfect bread maker banana loaf every time.
In this article, you’ll discover the best ingredients, step-by-step instructions, troubleshooting tips, and customization ideas to make your banana loaf even better. Let’s get started!
Introduction to Bread Maker Banana Loaf
What is a Bread Maker Banana Loaf?
A bread maker banana loaf is a banana bread baked in a bread machine instead of a traditional oven. The bread maker does all the work—mixing, kneading, and baking—giving you a delicious, homemade banana loaf with minimal effort. It’s a great option for busy people who want fresh banana bread without the hassle of manual mixing.
Why Use a Bread Maker for Banana Bread?
Using a bread maker for banana bread has several advantages:
- Hands-Free Baking: The machine does everything for you.
- Consistent Results: No more worrying about underbaking or overmixing.
- Less Cleanup: You only need to wash the bread pan.
- Perfect Texture: The bread maker ensures even baking, giving you a soft, moist loaf.
Next, let’s look at the ingredients you need for a bread maker banana loaf and how you can make healthy substitutions.
Ingredients and Substitutions
A delicious bread maker banana loaf starts with the right ingredients. Below, we’ll cover the essential components and how you can make healthier substitutions without compromising taste or texture.
Essential Ingredients for a Perfect Banana Loaf
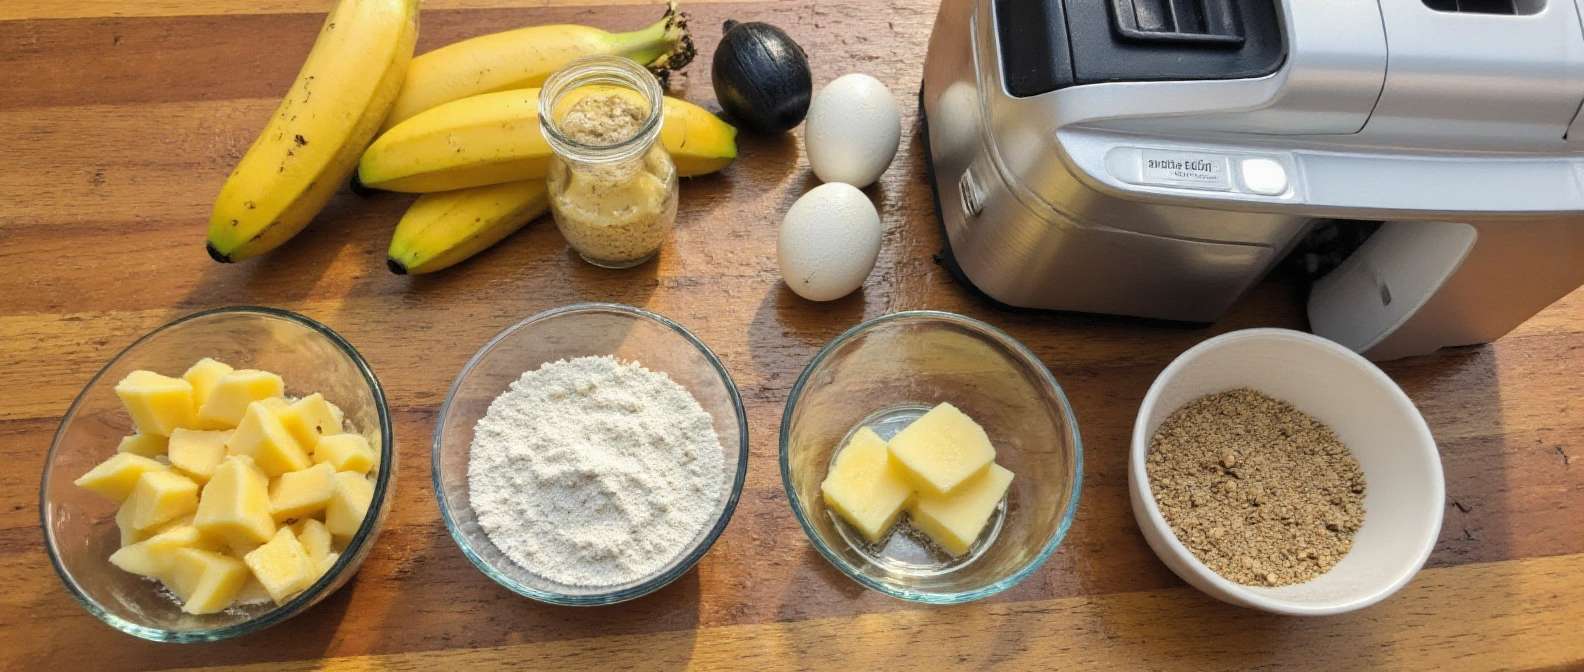
To make a soft, moist banana loaf in a bread maker, you’ll need the following ingredients:
- Ripe Bananas (3 medium-sized) – The riper, the better! Overripe bananas add natural sweetness and moisture.
- All-Purpose Flour (or Bread Flour) – 2 cups – Bread flour gives a slightly chewier texture, while all-purpose flour makes it softer.
- Sugar (½ cup) – White sugar adds sweetness, but you can adjust based on preference.
- Eggs (2 large) – Help with structure and texture.
- Butter or Oil (¼ cup) – Melted butter adds richness, while oil keeps it extra moist.
- Baking Powder (1 tsp) & Baking Soda (½ tsp) – Essential for a good rise.
- Salt (¼ tsp) – Enhances flavor.
- Milk (¼ cup) – Adds moisture and tenderness.
- Vanilla Extract (1 tsp) – Boosts the flavor.
- Cinnamon (optional, ½ tsp) – Adds a warm, spiced touch.
Best Substitutions for a Healthier Option
Want to make your bread maker banana loaf a little healthier? Try these swaps:
| Ingredient | Healthier Alternative | Benefit |
|---|---|---|
| White Sugar | Honey or Maple Syrup (⅓ cup) | Natural sweetener, lower glycemic index |
| All-Purpose Flour | Whole Wheat Flour (1 cup AP + 1 cup WW) | Adds fiber and nutrients |
| Butter | Greek Yogurt (¼ cup) | Lowers fat, adds protein |
| Milk | Almond or Oat Milk | Dairy-free option |
| Eggs | Flax Eggs (1 tbsp flax + 3 tbsp water per egg) | Vegan alternative |
These substitutions will help you customize your banana loaf based on your dietary preferences.
How to Make Bread Maker Banana Loaf Step by Step
Making a bread maker banana loaf is incredibly simple. Just add the ingredients to your bread machine, select the right settings, and let the machine do the work. Follow this step-by-step guide for a perfect, moist banana loaf every time.
Preparing the Ingredients Correctly
Before you start, ensure your ingredients are measured accurately and at room temperature for the best texture.
- Mash the bananas – Use a fork to mash the bananas until smooth. Some small lumps are fine.
- Melt the butter – If using butter instead of oil, melt it first for even mixing.
- Beat the eggs lightly – This helps them blend more easily into the batter.
Choosing the Right Bread Maker Settings
Every bread maker is different, but here’s how to choose the correct settings for your banana loaf:
- Program: Use the “Cake” or “Quick Bread” setting. If your machine doesn’t have these options, use “Basic” with no kneading.
- Crust Color: Light or Medium is best to prevent overbaking.
Need help adjusting your bread maker? Check the official user guide (DoFollow link) from Cuisinart for machine-specific settings.
Check out this Savory Bread Pudding Recipe for a unique twist on baked goods.
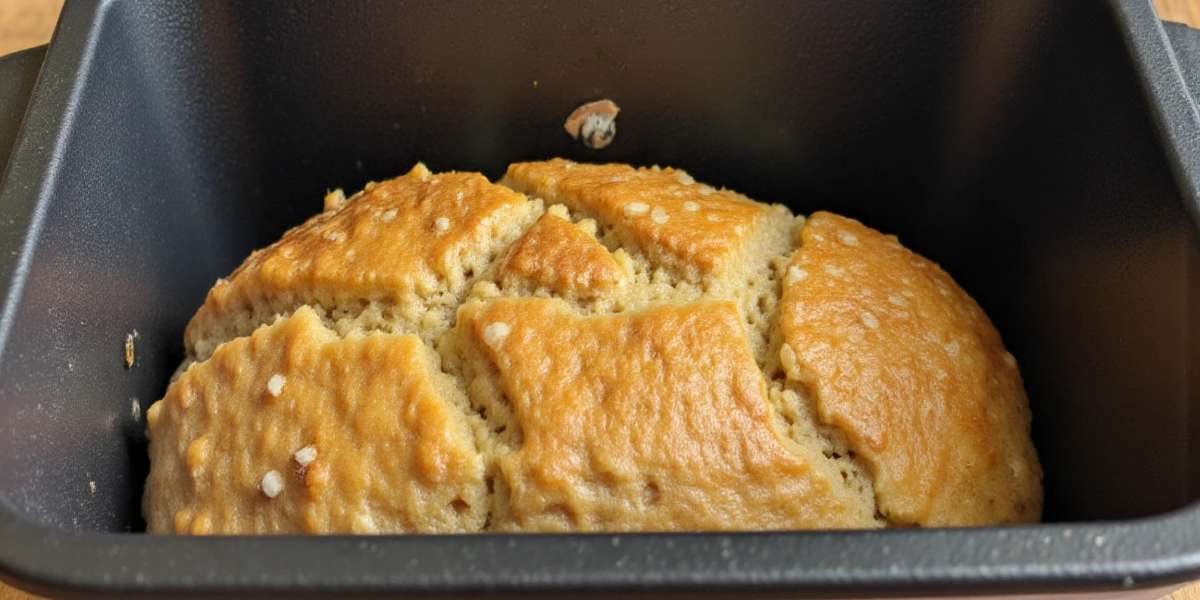
Baking and Cooling Process
- Add the ingredients in order: Most bread makers recommend adding wet ingredients first, followed by dry ingredients. The yeast (if used) or baking powder should go on top.
- Start the bread maker: Select the appropriate program and press start.
- Check for doneness: Insert a toothpick in the center after the cycle ends. If it comes out clean, the loaf is ready. If not, let it bake for another 5-10 minutes.
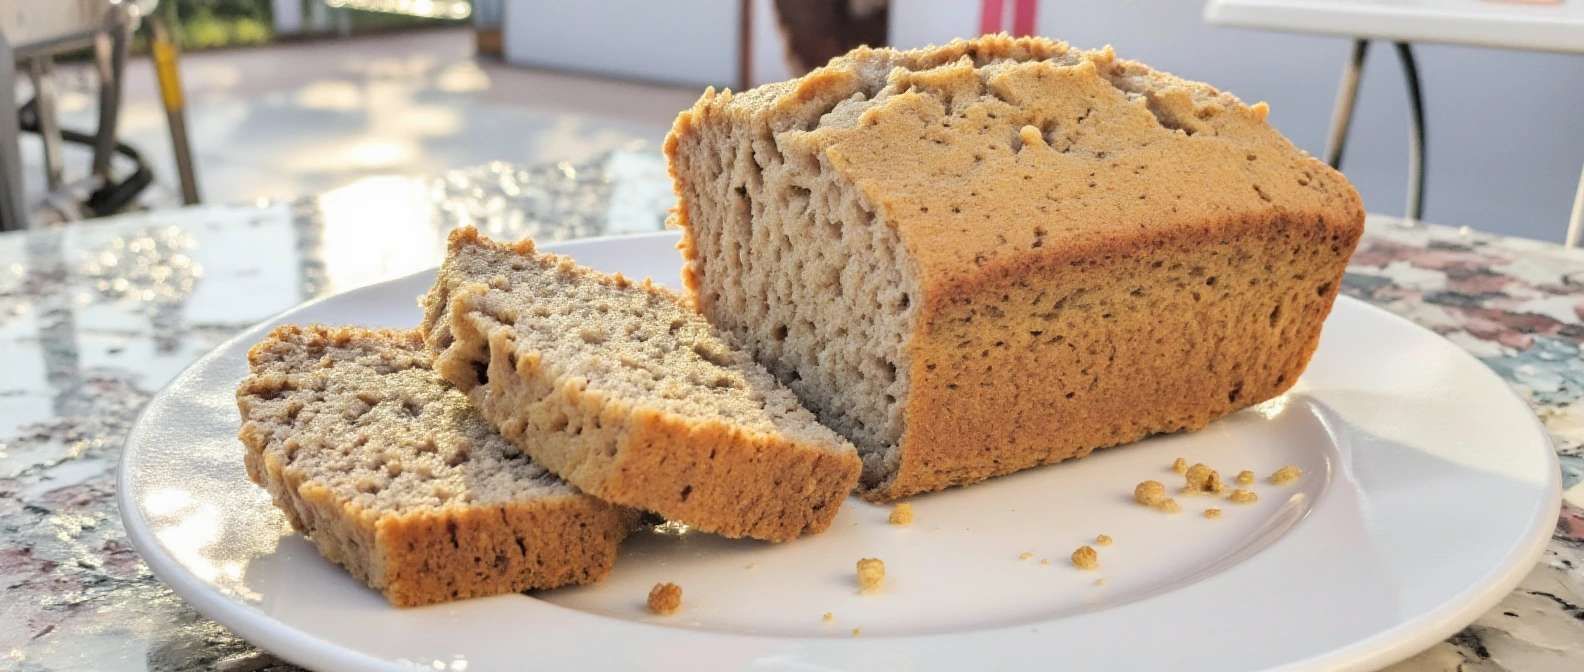
- Cool properly: Remove the loaf from the pan immediately and let it cool on a wire rack for at least 30 minutes before slicing.
By following these steps, you’ll get a soft, flavorful bread maker banana loaf with the perfect texture.
Common Mistakes When Making Bread Maker Banana Loaf
Even though a bread maker banana loaf is easy to make, certain mistakes can affect its texture, flavor, and rise. Below, we’ll cover the most common issues and how to avoid them.
Overmixing the Batter
One of the biggest mistakes when making a bread maker banana loaf is overmixing the batter. Unlike traditional bread, banana bread is more like a cake and doesn’t need kneading.
How to avoid it:
- If your bread maker has a kneading cycle, stop it after mixing.
- Use the “Cake” or “Quick Bread” setting to prevent over-kneading.
- Stir the ingredients gently before adding them to the machine to help with even mixing.
Using the Wrong Type of Bananas
Not all bananas are equal when it comes to baking. Unripe bananas don’t provide enough sweetness and can make the loaf dense.
How to avoid it:
- Use overripe bananas (dark, with brown spots). These add natural sweetness and moisture.
- If your bananas aren’t ripe enough, microwave them for 30 seconds to soften them.
Incorrect Bread Maker Settings
Selecting the wrong settings can lead to a hard crust, undercooked center, or dense texture.
How to avoid it:
- Always choose the “Cake” or “Quick Bread” setting instead of a regular bread program.
- If the loaf is too dark, switch to a lighter crust setting.
- Check the baking time in your machine and adjust if necessary.
Adding Ingredients in the Wrong Order
Most bread machines require ingredients to be added in a specific order for proper mixing.
How to avoid it:
- Add wet ingredients first (bananas, eggs, melted butter, milk).
- Add dry ingredients next (flour, sugar, baking powder, spices).
- If using yeast (for a yeasted banana bread), keep it separate from liquids until mixing starts.
By avoiding these common mistakes, you’ll ensure a perfectly baked bread maker banana loaf every time.
Bread Maker vs. Oven Baking – Which is Better?
Should you bake your banana loaf in a bread maker or use a traditional oven? Both methods have their pros and cons. Let’s compare them to help you decide which one works best for you.
Differences in Texture and Taste
The texture and taste of a bread maker banana loaf can be slightly different from an oven-baked one.
| Feature | Bread Maker | Oven Baking |
|---|---|---|
| Texture | Slightly denser, uniform crumb | Lighter, fluffier texture |
| Crust | Thick, slightly firmer | Golden brown, crispier crust |
| Moisture | Evenly distributed | Can dry out if overbaked |
| Flavor | Deep, fully developed | Can have a more caramelized flavor |
Pros and Cons of Each Method
Bread Maker: Convenience and Consistency
Pros:
- Hands-free – just add ingredients and press start.
- Less risk of burning or underbaking.
- Even baking with a soft, moist texture.
- No need to preheat an oven.
Cons:
- Less control over crust thickness.
- Can be denser than oven-baked banana bread.
- Some bread makers mix too aggressively, overmixing the batter.
Oven Baking: Traditional and Customizable
Pros:
- More control over texture and crust.
- Easy to add toppings like nuts or chocolate chips.
- Can bake multiple loaves at once.
Cons:
- Requires more hands-on attention.
- Risk of uneven baking or drying out.
- More cleanup with mixing bowls and pans.
Which One Should You Choose?
- Use a bread maker if you want an easy, mess-free, and consistent banana loaf.
- Use an oven if you prefer lighter, fluffier banana bread with a crispy crust.
If you own a bread maker, it’s worth trying both methods to see which one you prefer!
Troubleshooting Bread Maker Banana Loaf Issues
Even when following a recipe, sometimes a bread maker banana loaf doesn’t turn out as expected. Below are common issues and how to fix them.
Why is My Banana Loaf Too Dense?
A dense banana loaf is often caused by overmixing, too much flour, or not enough leavening.
How to Fix It:
- Use all-purpose flour instead of bread flour to keep the loaf softer.
- Measure flour correctly by spooning it into a measuring cup and leveling it off.
For expert tips on improving banana bread texture, read this troubleshooting guide (DoFollow link) from King Arthur Baking.
Looking for inspiration? Try How to Bake Butter Bread for another easy bread machine recipe.
What to Do if the Loaf Doesn’t Rise?
If your bread maker banana loaf comes out flat, it could be due to old baking powder, incorrect ingredient amounts, or too much moisture.
How to Fix It:
- Check expiration dates on baking powder and baking soda.
- Use overripe bananas—they help activate leavening agents.
- Make sure you’re using the “Cake” or “Quick Bread” setting on your machine.
- Avoid adding too much liquid (milk, butter, or banana puree).
How to Prevent a Soggy or Dry Banana Loaf?
A banana loaf that is too wet or too dry can ruin the texture.
For a soggy loaf:
- Let the loaf cool completely before slicing—it firms up as it cools.
- If the center is undercooked, bake for 5-10 more minutes in the oven at 325°F (160°C).
- Reduce banana or milk slightly if batter looks too wet.
For a dry loaf:
- Add an extra banana or 1-2 tbsp of milk to the batter.
- Use oil instead of butter for extra moisture.
- Avoid overbaking—use the “Light” crust setting if available.
By adjusting these small details, you can ensure your bread maker banana loaf comes out perfect every time!
Customizing Your Banana Loaf Recipe
One of the best things about a bread maker banana loaf is how easily you can customize it. Whether you want to add crunch, sweetness, or make it healthier, here are some great ideas!
Adding Nuts, Chocolate Chips, or Dried Fruits
Enhance the flavor and texture of your banana loaf with mix-ins. Add these ingredients after the initial mixing cycle so they don’t sink to the bottom.
| Mix-In | Amount | Effect |
|---|---|---|
| Walnuts or Pecans | ½ cup, chopped | Adds crunch and nutty flavor |
| Chocolate Chips | ½ cup | Makes it sweeter and richer |
| Raisins or Dried Cranberries | ⅓ cup | Adds a chewy texture and extra sweetness |
| Shredded Coconut | ¼ cup | Brings a tropical twist |
Tip: If your bread maker has a “Mix-in” signal, add extras when the machine beeps!
Making a Vegan or Gluten-Free Version
Want a healthier or allergy-friendly bread maker banana loaf? Try these substitutions:
- Egg-Free (Vegan): Use flax eggs (1 tbsp ground flaxseed + 3 tbsp water per egg).
- Dairy-Free: Swap milk for almond, oat, or coconut milk. Use coconut oil instead of butter.
- Gluten-Free: Replace all-purpose flour with a 1:1 gluten-free flour blend. Add ½ tsp xanthan gum to improve texture.
- Low-Sugar: Reduce sugar by half and add 1 extra mashed banana for natural sweetness.
Spice It Up with Extra Flavors
Give your banana loaf a unique twist with these flavorful additions:
- Cinnamon (½ tsp): Adds warmth and spice.
- Nutmeg (¼ tsp): Enhances banana flavor.
- Vanilla Extract (1 tsp): Brings out sweetness.
- Orange Zest (1 tsp): Adds a citrusy kick.
With so many options, you can make your bread maker banana loaf exactly how you like it!
Storing and Freezing Banana Loaf
To keep your bread maker banana loaf fresh and delicious, proper storage is key. Here’s how to store it for short-term use or freeze it for later.
Best Ways to Keep Your Banana Loaf Fresh
If you plan to eat your banana loaf within a few days, follow these storage tips:
- At Room Temperature: Wrap the loaf in plastic wrap or place it in an airtight container. Store it in a cool, dry place for up to 3 days.
- In the Refrigerator: If you need it to last longer, refrigerate it in an airtight container. It will stay fresh for up to 1 week.
- Prevent Drying Out: Add a paper towel inside the container to absorb excess moisture and keep the loaf soft.
How to Freeze and Reheat Banana Loaf
If you want to store your bread maker banana loaf for longer, freezing is the best option.
Freezing the Whole Loaf:
- Let the loaf cool completely before freezing.
- Wrap it tightly in plastic wrap, then in aluminum foil to prevent freezer burn.
- Place it in a freezer-safe bag and label it with the date.
- Store in the freezer for up to 3 months.
Freezing Slices for Easy Serving:
- Slice the loaf into individual portions.
- Place parchment paper between each slice to prevent sticking.
- Store in a freezer bag and freeze for up to 3 months.
Reheating Instructions:
- From Frozen (Whole Loaf): Let it thaw overnight at room temperature. Warm in the oven at 300°F (150°C) for 10-15 minutes.
- From Frozen (Slices): Microwave individual slices for 20-30 seconds or toast them for a crispy texture.
By storing and freezing properly, you can enjoy your bread maker banana loaf anytime without losing its flavor or texture!
FAQs About Bread Maker Banana Loaf
Here are answers to some of the most common questions about making a bread maker banana loaf.
Can you bake banana bread in a bread maker?
Yes! Most bread makers have a “Cake” or “Quick Bread” setting, which is perfect for banana bread. Unlike regular bread, banana bread does not need yeast and does not require kneading. Just mix the ingredients, add them to the bread pan, and let the machine do the work.
What is the number one mistake made when making banana bread?
The biggest mistake is overmixing the batter. This can result in a dense, tough loaf instead of a soft, moist one. To avoid this:
- Stop the bread maker’s kneading cycle if necessary.
- Gently fold the ingredients together before adding them to the machine.
- Use ripe bananas for a naturally soft texture.
Why are bread makers no longer popular?
Bread makers were very popular in the past, but some people now prefer oven baking because it gives them more control over texture and crust. However, bread makers are still a great hands-free option for people who want fresh bread without extra effort.
What is one drawback of using a bread machine?
One downside is the lack of customization. Unlike oven baking, where you can adjust temperature and baking time, bread makers have preset cycles. This means you can’t open the lid and make changes once the baking has started. However, using the right settings and ingredients can still give you a delicious bread maker banana loaf.
[tasty-recipe id=”857″]